Alpha testing tutorials
Introduction: Why this matters
In most engineering orgs today, developers are blocked by ticket-based provisioning or overly rigid CI/CD flows. The Platform Orchestrator helps platform teams enable dynamic, policy-enforced environments that still respect governance, identity, and existing infra setups.
In this tutorial, you’ll step into the shoes of a developer or platform engineer at a fictional company, Acme Corp, learning how to:
- Create projects and environments
- Understand how dynamic configuration works
- Deploy workloads with environment-specific values
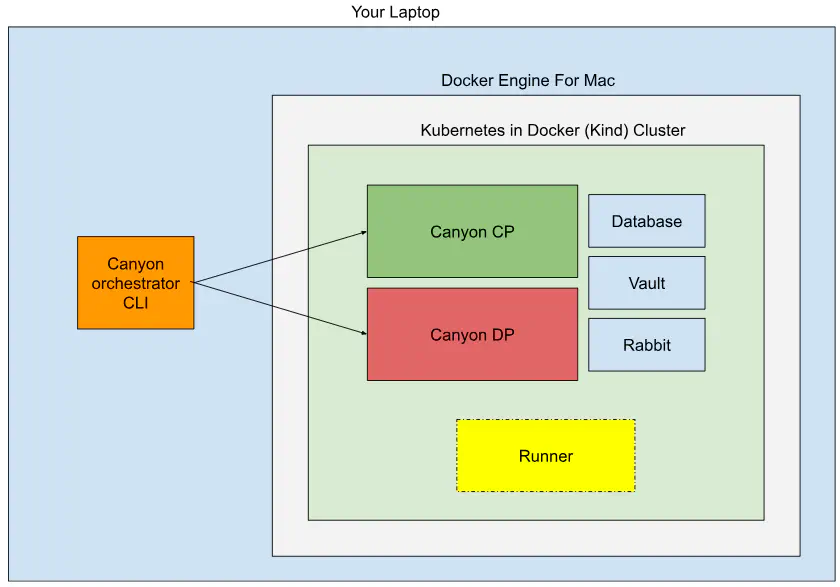
Preparation: local test setup
You’re testing the first alpha release of the Canyon Orchestrator. Everything runs locally using Kubernetes-in-Docker (kind), simulating a real platform experience.
Prerequisites
Ensure you have:
- Docker installed (Linux | Mac )
kindinstalled (brew install kindor Linux setup )- (Optional but helpful)
kubectl: Install guide - Terminal access
📺 Need a walkthrough? Watch: Video walkthrough and demo
Installation instructions
- Download the latest
release-X.tararchive: Download link
- 🔐 Password:
deploywithlove<3
- Extract the archive into a new directory (e.g.,
~/Downloads/release-X) - Open a terminal and navigate into the extracted directory:
cd ~/Downloads/release-X
- Run the install script:
./install.sh
- Set your environment variables:
export PATH=$(pwd):${PATH}
canyon config set-org alpha
canyon config set-url http://localhost:30080
- Verify everything is working:
canyon list projects
✅ If no error occurs, you’re good to go!
Teardown
Done with your testing, or want to update to newer software versions?
- In the terminal, run
kind delete cluster --name canyon - Download the latest
release-X.tarand follow the instructions again
Documentation, support and feedback
Got stuck? Head over to our Slack space to get support.
Curious how it all works? Take a quick glance at the core concepts of the Orchestrator.
Got feedback? Please share it here .
Tutorial 1 - How developers Get dynamic configuration
Learn how the Orchestrator empowers self-service and policy-driven workload management.
Context: Why this matters
It is common for software development projects to use a sequence of stages, or environments, for continuous release and testing of their artefacts. The Orchestrator meets project teams in this development lifecycle by offering a configurable project/environment structure. A core capability of the Orchestrator is to then perform deployments into environments, and to dynamically make environment-specific adjustments of such parts that require them.
This tutorial shows how the Orchestrator:
- Lets users maintain a project/environment structure
- Performs deployments into an environment
- Applies environment-specific, dynamic configuration of each deployment
- Promotes a deployment from one environment to the next
Step 1: Create a project
Projects represent application or team boundaries. Let’s create one:
canyon create project my-project
View the project:
canyon get project my-project
canyon list projects
Check environments:
canyon list environments my-project
🧩 Challenge: There’s another project in the system. Can you find and list its environments?
Step 2: Add a development environment
Projects use environment types (like development, staging, prod) to define shared policies.
canyon create environment my-project development --set env_type_id=development
🧩 Challenge: What other environment types are available?
Step 3: Understand the manifest
Manifests define the desired state of an environment: workloads + shared resources.
Let’s try:
canyon get manifest my-project development
❌ You’ll get an error - there’s no deployment yet.
Step 4: Create and deploy an empty manifest
Create a file named manifest.yaml:
workloads: {}
Deploy it:
canyon deploy my-project development ./manifest.yaml
This will succeed, but deploy nothing (empty manifest).
🧩 Challenge: Can you inspect the manifest of another project’s environment?
Step 5: Add a workload with dynamic config
List available resource types for this environment:
canyon list available-resource-types my-project development
Look for environment - this resource provides context variables like color and animal.
Update your manifest.yaml:
workloads:
  main:
    resources:
      env:
        type: environment
    variables:
      KEY: value
      COLOR: ${resources.env.outputs.values.color}
      ANIMAL: ${resources.env.outputs.values.animal}
Deploy it:
canyon deploy my-project development ./manifest.yaml
By default, outputs are not returned (for security). Use:
canyon deploy my-project development ./manifest.yaml --output -
Outputs are securely passed via ephemeral encryption and never stored by the Orchestrator.
🧩 Challenge: Try adding these flags to see how behavior changes:
--dry-run
--no-prompt
--plan-only
Step 6: Promote to production
Let’s simulate promoting your workload from development to production.
Create a prod environment:
canyon create environment my-project production --set env_type_id=production
Promote:
canyon deploy my-project production environment://development
To fetch outputs:
canyon deploy my-project production deployment://HEAD --output -
You’ll now see that outputs differ between dev and prod - a core feature of dynamic config by context.
Step 7: Understand why this worked
You can create projects and environments and deploy to them. But why did you see those other values in production, although the deployment was promoted from development without any changes?
The key is that the Orchestrator objects may contain dynamic elements, including “the current environment”. These elements will resolve to an environment-specific value, producing a different result without requiring any code changes in the application. In the present tutorial, the install script created a set of Kubernetes secrets named after the environments, and each deployment is reading its values from the secret for “the current environment”. In a real-world setup, dynamic configuration may change anything from a simple value to provisioning a different size or implementation of a resource.
Final Challenge: Inspect what matched
Use the CLI to inspect how the environment resource was resolved.
# Find matching module and rule
canyon get manifest my-project production
# Identify the resource → get its module ID
canyon get module <module_id>
# Inspect the rule that caused this match
canyon list rules
You’ll see how modules and rules enable dynamic provisioning logic.
Recap
You’ve:
- Created a project and environments
- Understood the purpose of environment types
- Deployed a manifest with dynamic variables
- Promoted a manifest across environments
- Seen how environment context drives configuration
Submit Feedback
Submit your feedback - especially if something didn’t work or felt confusing.
Tutorial 2 - Deploying a Score application with real infrastructure dependencies
Learn how the Orchestrator turns a declarative workload spec into real provisioned infrastructure.
Context: why this matters
In Tutorial 1, you saw how dynamic configuration is injected based on the environment context. But real workloads don’t run in a vacuum - they depend on infrastructure: storage buckets, secrets, access keys, and compute runtimes.
This tutorial shows how the Orchestrator:
- Converts a Score specification into a deployable workload
- Provisions dependent infrastructure resources in the right order
- Injects outputs dynamically into your running container
System setup recap
The installation script (install.sh) from Tutorial 1 already set up:
- A local Kubernetes cluster via Kind
- An in-cluster MinIO object store (S3-compatible)
- A module to convert Score specs into Kubernetes deployments
Step 1: Understand what you’re about to deploy
In this tutorial, you’ll:
- Deploy a Score-defined app that lists files in an S3 bucket
- Use the Orchestrator to provision:
- The S3 bucket
- An access key for that bucket
- The application container, with the key injected as variables
The runtime will be your local Kind cluster. The MinIO bucket acts as our S3 implementation.
Step 2: Verify modules are set
Check that the score-k8s module is in place:
canyon get module score-k8s
This points to a module that knows how to take a Score workload and deploy it to Kubernetes using Terraform: https://github.com/humanitec/module-definition-library/tree/preview/score-workload/kubernetes
Step 3: Write your Score file
Create a new file named score.yaml:
apiVersion: score.dev/v1b1
metadata:
  name: my-app
containers:
  main:
    image: minio/mc
    command: ["/bin/sh", "-c", "mc alias set minio http://minio:9000 $BUCKET_ACCESS_KEY_ID $BUCKET_SECRET_KEY; while true; do date; mc ls --summarize minio/$BUCKET; sleep 5; done"]
    variables:
      BUCKET_ACCESS_KEY_ID: ${resources.bucket-key.access_key_id}
      BUCKET_SECRET_KEY: ${resources.bucket-key.secret_key}
      BUCKET: ${resources.bucket.bucket}
resources:
  bucket:
    type: s3
  bucket-key:
    type: s3-access-key
    params:
      for: ["${resources.bucket.bucket}"]
What this app does: Runs an infinite loop in a container that lists contents of a provisioned bucket using credentials injected at runtime.
Step 4: Deploy the Score app
We’ll deploy into the same project and environment from Tutorial 1:
canyon score deploy my-project development ./score.yaml
This command:
- Patches the manifest
- Adds a new workload
my-app - Links it to
s3ands3-access-keyresources
Step 5: Verify deployment
Check that the Kubernetes deployment exists:
kubectl get deployment my-app
Check container logs:
kubectl logs deployment/my-app
You should see lines like:
Total Size: 0 B
Total Objects: 0
Challenge: Inspect the deployment internals
Where do those environment variables come from?
kubectl get deployment my-app -o yaml
kubectl exec deployment/my-app -- env | grep BUCKET
Then, inspect the resulting manifest:
canyon get manifest my-project development
You should now see:
- A
bucketresource (MinIO) - A
bucket-key(access credentials) - A
score-workload(your application)
Step 6: Understand Why This Worked
Let’s trace what just happened:
Why did the s3 resource create a MinIO bucket?
canyon list available-resource-types my-project development
The s3 type is mapped to the in-cluster-minio module.
Check the module:
canyon get module in-cluster-minio
It uses: https://github.com/humanitec/module-definition-library/tree/preview/s3/minio
How is it connected to the real MinIO backend?
canyon get provider minio default
The provider is configured to connect to the in-cluster MinIO service, with auth values injected from Kubernetes secrets.
Why did the Score workload get deployed to Kubernetes?
Score supports multiple runtimes, but in your current config:
canyon get module score-k8s
…is enforced by a rule for the score-workload resource type.
It uses Terraform code that translates Score into a valid Kubernetes Deployment: https://github.com/humanitec/module-definition-library/blob/preview/score-workload/kubernetes/main.tf
Recap
You’ve:
- Written a declarative Score spec
- Let the Orchestrator provision infra dependencies
- Verified a working deployment to Kubernetes
- Traced exactly how this happened via modules and providers
Final Challenge
Use get and list commands to:
- Explore how the right modules were matched
- Inspect the modules and rule that triggered the S3 bucket deployment
- Find how secrets were injected into the workload
Tutorial 3 - Adding support for in-cluster Postgres instances
Learn how to author modules to support a Postgres instance as a resource.
Context: Why this matters
Databases are a very common resource for applications to consume. Everyone needs to store state somewhere after all. There are many places where you may want to provision a Postgres instance for your application teams: in the cloud, on premise, in your Kubernetes cluster, in a different Kubernetes cluster, for example. The Platform Orchestrator can support all of these patterns, but for this tutorial we’re going to keep things simple and define a postgres resource type which provisions a Postgres node and database in the Kubernetes cluster using an open source Helm chart.
Step 1: Define a postgres resource type
Let’s define the resource type that our developers can consume. We will output the connection properties.
canyon create resource-type postgres --set-yaml=- <<"EOF"
description: "A postgres database"
output_schema:
  type: object
  properties:
    hostname: {"type": "string"}
    port: {"type": "integer"}
    database: {"type": "string"}
    username: {"type": "string"}
    password: {"type": "string"}
EOF
Our developers can’t use this unless we define a module and a module rule to support it. If we attempted to list the available resource types for a project enviornment, e.g. canyon list available-resource-types example dev, the postgres type would not show up.
Step 2: Create the new module
All modules in the orchestrator use Terraform as an IaC specification. For this module, we’re going to use the Helm Terraform Provider to deploy 1-node Postgres instances into the Kubernetes cluster. An alternative implementation might provision Google Cloud SQL or Amazon RDS instances.
To use the Helm provider we must first define which cluster these will be released to using a provider configuration. We’re going to use the Kubernetes service account of the runner to deploy to our kind cluster, so the configuration here is very minimal:
canyon create provider helm in-cluster-helm --set-yaml=- <<"EOF"
source: "hashicorp/helm"
version_constraint: "~> 3.0.2"
configuration: {}
EOF
This is the most important step, we’re going to define the postgres module in Terraform. Normally, in production cases, you would define the module in a Git repo and set that as the module_source so that it can be tested and source controlled, however today we’re going to use the inline module_source_code parameter. In the module source below you will see other features at play:
- Generating a random release id and service name using the built-in
random_idmodule - Generating a random password for the database user using the built-in
random_passwordmodule - Setting the outputs based on the values we used in the
helm_releasemodule.
Note also that we are setting the provider mapping to use our in cluster Helm provider. By explicitely defining the Tofu/Terraform providers to be used in a module, you reduce the risk of a module provisioning infrastructure in the wrong accounts, clouds, or locations. In more advanced cases, the provider configuration will configure account ids, regions, and other specific configuration that may differ between modules.
canyon create module in-cluster-postgres --set-yaml=- <<"EOF"
resource_type: postgres
provider_mapping:
  helm: helm.in-cluster-helm
module_source_code: |

  terraform {
    required_providers {
      helm = {
        source = "hashicorp/helm"
      }
    }
  }

  resource "random_id" "release" {
    prefix = "db-"
    byte_length = "5"
  }

  resource "random_password" "pwd" {
    length = 16
    special = true
  }

  resource "helm_release" "db" {
    name = random_id.release.hex
    namespace = "default"
    repository = "oci://registry-1.docker.io/bitnamicharts"
    chart = "postgresql"
    version = "16.7.18"
    set = [
      { name = "auth.database", value = "default"},
      { name = "auth.username", value = "db-user" },
      { name = "auth.password", value = random_password.pwd.result },
    ]
    wait = true
  }

  output "hostname" {
    value = "${random_id.release.hex}-postgresql.default.svc.cluster.local"
  }

  output "port" {
    value = 5432
  }

  output "database" {
    value = "default"
  }

  output "username" {
    value = "db-user"
  }

  output "password" {
    value = random_password.pwd.result
    sensitive = true
  }

EOF
This Terraform module is simplified, but hopefully you can see how it could be adapted to be very powerful:
- Embed the generated password in a Kubernetes secret resource to avoid exposing it in the Helm chart values.
- Support a namespace input.
- Control more properties on the database setup: replicas, backups, persistence, metrics, etc.
Step 4: Provisioning postgres databases in a manifest
Let use our new module to provision postgres resources in a new project.
canyon create project db-example
canyon create env db-example dev --set env_type_id=development
A critical part of platform engineering is configuring which environments, teams, or projects can use which modules that you have configured. By default, modules are not matched to any requests. You must first create a module rule for it. Module rules support matching particular project ids, environment ids, environment types, and other criteria to restrict access. Let’s enable this module just for the new project.
canyon create rule --set module_id=in-cluster-postgres --set project_id=db-example
We’ll deploy two databases, one shared between both workloads, and one dedicated to the workload:
canyon deploy db-example dev --no-prompt --output - - <<"EOF"
workloads:
  apple:
    variables:
      SHARED_DB_CONN: "host=${shared.db.outputs.hostname} port=${shared.db.outputs.port} user=${shared.db.outputs.username} password=${shared.db.outputs.password} dbname=${shared.db.outputs.database} sslmode=disable"
  banana:
    variables:
      SHARED_DB_CONN: "host=${shared.db.outputs.hostname} port=${shared.db.outputs.port} user=${shared.db.outputs.username} password=${shared.db.outputs.password} dbname=${shared.db.outputs.database} sslmode=disable"
      EXTRA_DB_CONN: "host=${resources.extra-db.outputs.hostname} port=${resources.extra-db.outputs.port} user=${resources.extra-db.outputs.username} password=${resources.extra-db.outputs.password} dbname=${resources.extra-db.outputs.database} sslmode=disable"
    resources:
      extra-db:
        type: postgres

shared:
  db:
    type: postgres
EOF
Examine the outputs of this deployment to see the effect:
- Both workloads have a variable set to consume the same database.
- The
bananaworkload has an additional database resource which clearly has a different service name and password
We can also list the services in the cluster:
kubectl get statefulsets -l 'app.kubernetes.io/name=postgresql'
kubectl get services -l 'app.kubernetes.io/name=postgresql'
Since these databases are only exposed within the cluster, the next steps might be to deploy a Score-based workload into the cluster to consume them.
Step 5: Removing a resource
Let’s remove the banana workload and see the effect of undeploying a resource. We could download, edit the manifest, and redeploy it. Or, we can use a one-line command to patch it in place.
canyon deploy db-example dev deployment://HEAD --drop-workload banana --output -
When we list the services again we can see that the shared database remains while the extra db was removed.
kubectl get statefulsets -l 'app.kubernetes.io/name=postgresql'
kubectl get services -l 'app.kubernetes.io/name=postgresql'
Frequently asked questions
How did the Helm provider authenticate to the cluster?
The Helm provider defaults to using the local pods’ service account. Therefore, your Runner instance running in your cluster was able to use its preconfigured RBAC roles to deploy Kubernetes objects into the same cluster.
If we wanted to provide specify authentication to a different cluster, we could create a new Provider and set the Provider Mapping in the module definition.
Recap
You’ve:
- Defined a new custom resource type
- Defined a Helm provider
- Written a new module in Terraform HCL to deploy a Helm chart into the cluster
- Defined a rule to allow only the environments of a specific project to use it
- Provisioned and destroyed multiple database resources
Submit Feedback
Submit your feedback - especially if something didn’t work or felt confusing.
Next Up
Tutorial 4 - Working with the active resource graph
Learn how to view and query the resource graph of an environment.
You’ll explore how the Orchestrator represents workloads and dependencies as a graph, and how to navigate and debug resource relationships.
Tutorial 5 - Writing modules
Understand how platform engineers can build reusable Terraform-based modules.
You’ll create and share modules that can provision infrastructure or deploy workloads across any environment that supports a Terraform provider - cloud or on-prem.